1. erwin에서 Tools -> Data Browser 선택
2. Data Browser에서 Reports -> Open Reports 클릭 후 첨부파일 (Report4FCR_Domain.erp) 선택
* 새로운 Report 만들 경우
- File -> New Report
- Name에 report 이름을 적고 Physical 선택 후 Category는 Column 선택
- 왼쪽 트리에서 Column -> Table -> Name 선택, Column -> Name, Column -> Datatype 선택
3. 왼쪽 트리에서 Table Reports -> reportTableDef2 더블 클릭 또는 마우스 우클릭 후 excute.. 클릭
4. 하위 트리 메뉴가 생성되는데 마우스 우클릭 후 Export... 클릭하면 export 메뉴가 나옴
- Export : csv로 선택
- Presentation : Tabuilar - 중복되는 결과값은 제외
Tabular with duplicates - 중복과 상관없이 모두 출력
분류 전체보기
- [ERWin] erwin(erd) excel(엑셀) export 2014.09.26
- [Tibero] 티베로 odbc 연결 2014.09.18 1
- [Windows] 네트워크 드라이브 연결 2014.09.18
- [jQuery] 파일업로드 플로그인 2014.09.11
- [CSS] css 초기화 2014.09.03
- [Java] JDK Portable 만들기 2014.07.01
- [Eclipse] 이클립스 ERD 플러그인 (ER Master Plugin) 2014.06.19
- [ETC] 프로그래밍 폰트 2014.06.19
- [HTML] 인터넷, Web, HTML, 블로그에서 수식 사용하기 (Equation or math in HTML, blog) 2014.06.19
- [CSS] Div Center 에 띄우기 2014.06.16
[ERWin] erwin(erd) excel(엑셀) export
[Tibero] 티베로 odbc 연결
ODBC 드라이버 다운로드 URL : http://technet.tmaxsoft.com
Tibero5 32Bit ODBC 드라이버
 tbodbc_driver_installer_5_32.exe
Tibero5 64Bit ODBC 드라이버
 tbodbc_driver_installer_5_64.exe
1. ODBC 드라이버 다운로드
1) tmax technet 사이트에 접속 후 다운로드 > 데이터베이스 > Tibero 메뉴에서 해당 버전 다운로드를 클릭한다.
2) 최하단의 OS를 선택하면 zip 파일로 된 파일을 다운로드 한다.
3) 다운로드 받은 파일을 압축 해제하고 binary 폴더 안에 tibero5-bin-S1410-windows32-84458-opt-tested.tar.gz 파일을 압축 해제한다.
4) ODBC 32bit 용
드라이버 Installer : binary\tibero5-bin-S1410-windows32-84458-opt-tested.tar\tibero5-bin-S1410-windows32-84458-opt-tested\tibero5\bin\tbodbc_driver_installer_5_32.exe
드라이버 DLL : binary\tibero5-bin-S1410-windows32-84458-opt-tested.tar\tibero5-bin-S1410-windows32-84458-opt-tested\tibero5\bin\libtbcli.dll
5) ODBC 64bit용
드라이버 Installer : binary\tibero5-bin-S1410-windows32-84458-opt-tested.tar\tibero5-bin-S1410-windows32-84458-opt-tested\tibero5\client\win64\bin\tbodbc_driver_installer_5_64.exe
드라이버 DLL : binary\tibero5-bin-S1410-windows32-84458-opt-tested.tar\tibero5-bin-S1410-windows32-84458-opt-tested\tibero5\client\win64\lib\libtbcli.dll
2. ODBC 드라이버 설치
1) C:\Program Files\Tibero 경로에 tbodbc_driver_installer_5_32.exe 복사
2) C:\Program Files\Tibero\bin 경로에 libtbcli.dll 복사
3) 환경변수 추가
변수이름 : TB_HOME
변수값 : C:\Program Files\Tibero
4) cmd 에서 명령어 실행
명령어 : C:\Program Files\Tibero\tbodbc_driver_installer_5_32.exe -i
3. ODBC 드라이버 확인
※ Windows가 64bit 이면서 ODBC는 32bit로 설치한 경우에는 odbc 추가 시 32bit용 odbc 관리툴을 실행해야 한다.
실행 > odbcad32 실행하면 OS 버전에 맞는 관리툴이 기본적으로 실행된다.
- 32bit ODBC 관리툴 실행 : C:\Windows\SysWOW64\odbcad32.exe
- 64bit ODBC 관리툴 실행 : C:\Windows\System32\odbcad32.exe
[Windows] 네트워크 드라이브 연결
[Windows7] 내 자격 증명 기억을 해도 네트워크 드라이브 인증을 요구할때
참고 : http://ddoong2.com/m/post/572
네트워크 드라이브를 연결해서 사용하는데 로그인 할때마다 풀리는 경우가 발생했다.
분명 '내 자격 증명 기억'을 체크 했는데
설정 방법은 Windows7 일때...
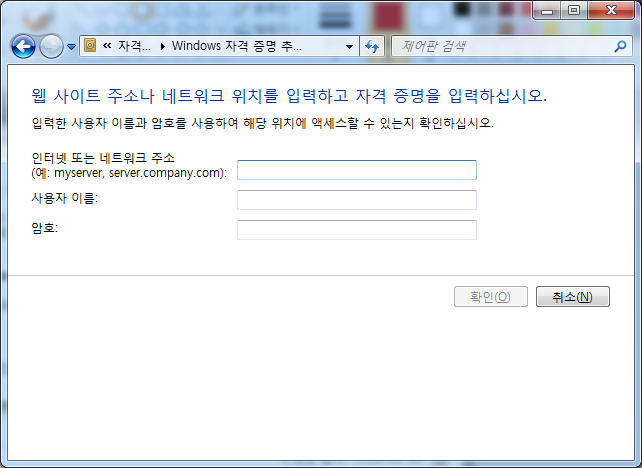
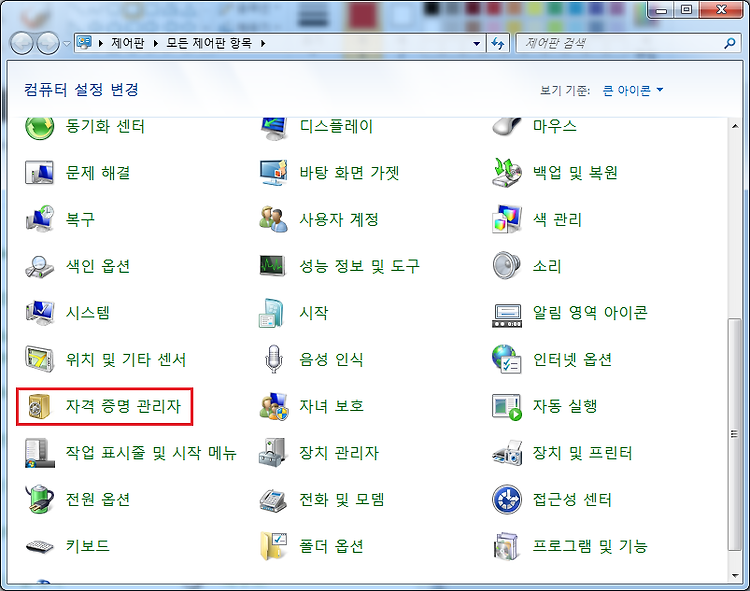
시작 -> 제어판 -> 자격증명 관리자 -> Windows 자격증명 추가

====================================================================================================================================
네트워크 드라이브 연결 지속
참고 : http://blog.naver.com/hanyu99/80110310727
http://support.microsoft.com/kb/297684/ko
windows의 버전 마다 차이기 있을 수는 있겠지만 네트워크 공유에 드라이브를 매핑하면
해당 시스템의 유휴 세션 시간이 지난면 매핑된 드라이브 연결이 끊어 질 수가 있습니다.
그로 인해 말씀하신것 처럼 매핑된 드라이브 아이콘에 붉은색 x 를 표시하게 됩니다.
하지만 다시 액세스 또는 탐색 시 붉은색 x가 없어지게 됩니다.
이런 유휴 시간이 있는 것은 지정된 유휴 시간 후 유휴 연결을 제거하여 사용되지 않는
세션에서 서버 리소스가 낭비되는 것을 줄이기 위해서 입니다.
만약 해당 연결 시간을 지속적으로 또는 그 시간을 늘리기 위해서는 하기의 명령줄을 활용하시면 되는데요.
net config server /autodisconnect:number
입니다. 여기서 number는 연결을 끊기 전에 서버가 대기하도록 할 시간이며 최대 값은 65,535입니다.
그리고 autodisconnect 값을 0(영)으로 설정하면 autodisconnect 기능은 해제되지 않으며
autodisconnect 기능을 해제하려면 아래와 같이 하시면 됩니다.
net config server /autodisconnect:-1
하기의 링크에서 자세한 사항을 보실 수 있습니다.
참고 사항
net config server는 다음과 같은 정보를 표시합니다.
--------------------------------------------------------------------
C:\>net config server
서버 이름 \\culaworld
서버 설명 테스트
소프트웨어 버전 Microsoft Windows Server 2003
서버 활성화
NetbiosSmb (000000000000)
NetBT_Tcpip_{xxxxxxxxxxx-xxxx-xxxx-xxxx-xxxxxxxxxxxxxxx} (xxxxxxxxxxxx)
서버 숨겨짐 아니오
로그온 사용자 최대 수 제한 없음
세션당 열 수 있는 파일의 최대 수 16384
유휴 세션 시간 (분) 15
명령을 잘 실행했습니다.
--------------------------------------------------------------------
Windows XP의 인바운드 연결 제한
http://support.microsoft.com/kb/314882/ko
Windows NT Workstation 3.5x 및 4.0으로의 인바운드 연결(Inbound Connection) 제한
http://support.microsoft.com/kb/122920/ko
서버 서비스 구성과 조정
http://support.microsoft.com/kb/122920/
명령줄에서 공유 폴더 관리
[jQuery] 파일업로드 플로그인
1. Fyneworks Multiple File Upload
URL : https://www.fyneworks.com/jquery/multiple-file-upload/
2. Blueimp jQuery File Upload
URL : http://blueimp.github.io/jQuery-File-Upload/
3. Uploadify
URL : http://www.uploadify.com/
4. Plupload
URL : http://www.plupload.com/
[CSS] css 초기화
Normalize : http://necolas.github.io/normalize.css/
Normalize.css 소개
Normalize.css는 HTML 요소의 기본 스타일을 브라우저 간 일관성을 유지하도록 돕는 CSS 파일이다. 이것은 Boilerplate(보일러플레이트) 및 Bootstrap(부트스트랩) 등과 같은 크고 작은 프로젝트에서도 두루두루 사용되고 있다.
Normalize.css 특징
브라우저(모바일 브라우저를 포함하여)를 광범위하게 지원하며, HTML5 요소, 타이포그래피, 목록(lists), embeded 콘텐츠, 폼과 테이블을 일관성있게 통일시키는 CSS를 포함한다.
다른 CSS reset 과는 달리 사용하기 좋은 기본값들은 유지한다.
HTML 요소의 다양한 스타일을 정규화한다.
버그 및 브라우저 간 차이점을 수정한다.
부분적인 개선과 가용성을 향상시킨다.
코드에 대한 자세한 주석이 달려 이해를 돕는다.
normalize는 버전 1은 구형 IE(IE6)를 지원하지만 더이상 개발이나 수정이 이루어지지 않는다. 버전 3대가 현재 개발되고 애용되는 버전이다.
@charset "UTF-8"; |
=================================================================================================================================
참고 : http://www.cssreset.com/
@charset "UTF-8"; |
[Java] JDK Portable 만들기
출처 : http://www.brucalipto.org/java/how-to-create-a-portable-jdk-1-dot-7-on-windows/
JDK6 버전 Portable 다운로드 : http://sourceforge.net/projects/portableapps/files/Java%20Portable/
- JDK 1.7 Portable
As a Java developer sometimes I need a version of Java Development Kit (JDK) that is not the one installed on my PC. Oracle Java installer on Windows does too many things that I cannot control (like changing the JVM used by browsers to run applets). As of this writing Java 7 is at version u45 and you can download it from here. Open the downloaded file with 7-zip (in my case was jdk-7u45-windows-i586.exe) and then open the tools.zip you find inside. Extract everything to a convenient path like C:\jdk-1.7u45. Now it is shell time so open a DOS console (Start->Run…->cmd) and type:
Now you are almost done but you need to rename some files:
Rename all these files removing the .pack part (eg.: rename charsets.pack.jar to charsets.jar):
Finally test you new portable JDK 1.7:
I hope this tutorial can help you… if you find errors please report them to me and I will correct as soon as possible.
=========================================================================================================
=========================================================================================================
- JDK 1.8
As a Java developer sometimes I need a version of Java Development Kit (JDK) that is not the one installed on my PC. Oracle Java installer on Windows does too many things that I cannot control (like changing the JVM used by browsers to run applets). As of this writing Java 8 is not yet available for general consumption but you can get an early access release here. Open the downloaded file with 7-zip and then open the tools.zip you find inside. Extract everything to a convenient path like C:\jdk-1.8-ea. Now it is shell time so open a DOS console (Start->Run…->cmd) and type:
Now you are almost done but you need to rename some files:
Rename all these files removing the .pack part (eg.: rename charsets.pack.jar to charsets.jar):
Finally test you new portable JDK 1.8:
I hope this tutorial can help you… if you find errors please report them to me and I will correct as soon as possible.
[Eclipse] 이클립스 ERD 플러그인 (ER Master Plugin)
[ETC] 프로그래밍 폰트
나눔고딕 코딩 : https://github.com/naver/nanumfont
https://developers.naver.com/opensource/tools/editor/
D2 코딩 : https://github.com/naver/d2codingfont
ttf : true type font, 2차원 베지어
ttc : ttf를 묶어놓은 버전
※ ttc를 보면 기본/bold가 묶여 있으므로 ttc를 설치하거나 ttf를 각각 설치하면 된다.
나눔고딕코딩글꼴 : https://github.com/naver/nanumfont
나눔바른고딕 : https://hangeul.naver.com/font
Bitstream vera sans mono : http://www.dafont.com/bitstream-vera-mono.font
[HTML] 인터넷, Web, HTML, 블로그에서 수식 사용하기 (Equation or math in HTML, blog)
[CSS] Div Center 에 띄우기
참고 : http://stackoverflow.com/questions/210717/using-jquery-to-center-a-div-on-the-screen
- scroll 계산 없이 처리
(function($){
    $.fn.extend({
        center: function () {
            return this.each(function() {
                var top = ($(window).height() - $(this).outerHeight()) / 2;
                var left = ($(window).width() - $(this).outerWidth()) / 2;
                $(this).css({position:'absolute', margin:0, top: (top > 0 ? top : 0)+'px', left: (left > 0 ? left : 0)+'px'});
            });
        }
    });
})(jQuery);
- scroll 계산 포함
(function($){
     $.fn.extend({
          center: function (options) {
               var options =  $.extend({ // Default values
                    inside:window, // element, center into window
                    transition: 0, // millisecond, transition time
                    minX:0, // pixel, minimum left element value
                    minY:0, // pixel, minimum top element value
                    withScrolling:true, // booleen, take care of the scrollbar (scrollTop)
                    vertical:true, // booleen, center vertical
                    horizontal:true // booleen, center horizontal
               }, options);
               return this.each(function() {
                    var props = {position:'absolute'};
                    if (options.vertical) {
                         var top = ($(options.inside).height() - $(this).outerHeight()) / 2;
                         if (options.withScrolling) top += $(options.inside).scrollTop() || 0;
                         top = (top > options.minY ? top : options.minY);
                         $.extend(props, {top: top+'px'});
                    }
                    if (options.horizontal) {
                          var left = ($(options.inside).width() - $(this).outerWidth()) / 2;
                          if (options.withScrolling) left += $(options.inside).scrollLeft() || 0;
                          left = (left > options.minX ? left : options.minX);
                          $.extend(props, {left: left+'px'});
                    }
                    if (options.transition > 0) $(this).animate(props, options.transition);
                    else $(this).css(props);
                    return $(this);
               });
          }
     });
})(jQuery);$(document).ready(function(){
$('#mainDiv').center();
$(window).bind('resize', function() {
$('#mainDiv').center({transition:300});
});
);$('your-selector').position({
of: $(window)
});$.fn.center = function() {
this.css({
'position': 'fixed',
'left': '50%',
'top': '50%'
});
this.css({
'margin-left': -this.outerWidth() / 2 + 'px',
'margin-top': -this.outerHeight() / 2 + 'px'
});
return this;
}jQuery.fn.center = function ($) {
var w = $(window);
this.css({
'position':'absolute',
'top':Math.abs(((w.height() - this.outerHeight()) / 2) + w.scrollTop()),
'left':Math.abs(((w.width() - this.outerWidth()) / 2) + w.scrollLeft())
});
return this;
}.center{
position: absolute;
height: 50px;
width: 50px;
background:red;
top:calc(50% - 50px/2); /* 50% - height/2 */
left:calc(50% - 50px/2); /* 50% - width/2 */
}
==========================================================================================================
Bootstrap Modal Center 띄우기
참고 : http://codepen.io/dimbslmh/full/mKfCc
 Report4FCR_Domain.erp
 libtbcli.dll

 나눔고딕코딩-Bold.ttf
 D2Coding-1.2.zip