출처 : http://blog.naver.com/PostView.nhn?blogId=romeoyo&logNo=120188644234

Jquery UI 를 이용해 서비스 개발 작업을 하고 있는데. 어처구니없는 난관에 봉착했다.

무려 $99를 지불하고 구입한 RedActor html 에디터를 Jquery UI의 다이얼로그에 심었더니 이미지 URL삽입 같은 자체 UI의 입력란에 포커스가 가지 않는것이다.

무슨 유료 라이브러리가 이래 허접할까 툴툴대고 있었는데 범인은 Jquery UI 로 판명났다.


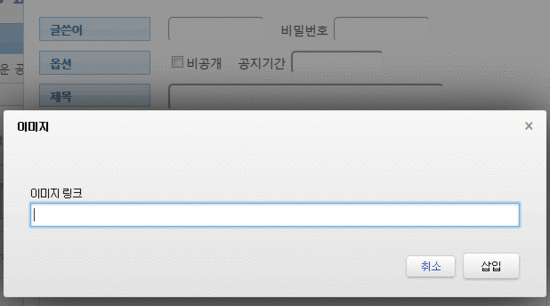
아래가 그 증상이다.

당신이 클릭의 신이어도 절대로 "이미지링크" 입력란에 포커스가 가지 않는다. (IE에서는 클릭하면 가긴 간다)


이틀정도 삽질하다가 구글신이 답을 주셨다.

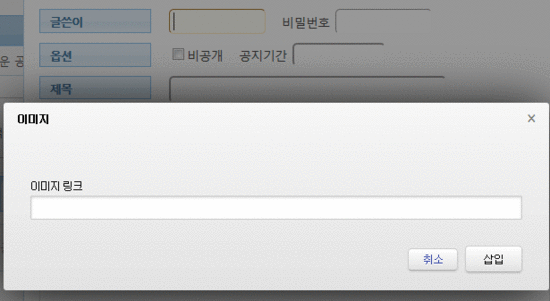
아래가 정상적으로 포커스가 간 것이다.


Jquery, Jquery UI 라이브러리를 로딩하고 아래의 한줄을 추가해 주면 된다.


$.ui.dialog.prototype._focusTabbable = function(){};


잉글리쉬에 능숙하다면 아래 자료를 봐도 된다. Fix되었고, 관련 옵션이 추가되었다고 하는데. 내가 쓰는 Jquery UI 1.10.2 는 문제가 있으며, 공식 API문서에도 관련 옵션을 못찾겠다 꾀꼬리.


http://bugs.jqueryui.com/ticket/4731


출처 : http://hmjkor.tistory.com/408

참고 : https://tomcat.apache.org/tomcat-8.0-doc/jndi-datasource-examples-howto.html

apache tomcat 5.5 이후 버전에서의 Context 생성 방법입니다.


server.xml 파일을 열게 되면 xml Tag가 Service라는 태그의 속성명 name을 찾습니다.

일반적으로는  <Service name="Catalina"> 이렇게 되어 있습니다.


먼저 context를 만들기 위한 폴더를 생성합니다.

service 태그의 name값인 Catalina 폴더를 만들고 다시 그 안에 localhost 라는 폴더를 만듭니다.

최종적으로는 위에 내용대로라면 톰캣경로/conf/Catalina/localhost가 되겠네요


그럼 이제 이하위에 파일을 생성하시면 되는데 파일은 xml 형식입니다.

root Context는 ROOT.xml을 만드시면 되고 기타 context는 컨텍스트명.xml파일로 만드시면 됩니다.


파일이 생성이 되었으면 이제 관련 설정을 파일에 추가하면 됩니다.

test라는 컨텍스트를 만들게 되면 아래와 같은 형식이 되겠습니다.


server.xml

<?xml version='1.0' encoding='utf-8'?>
<Context path="/test"
         docBase="/home/test/web"
         debug="0"
         reloadable="true"
         crossContext="true">

<Valve className="org.apache.catalina.valves.AccessLogValve"
            directory="/home/test/logs/access"
            prefix="access."
            suffix=".log"
            pattern="common"
            fileDateFormat="yyyy-MM-dd"
            resolveHosts="false"/>
    <Resource name="jdbc/my" auth="Container"
                        type="javax.sql.DataSource" driverClassName="com.mysql.jdbc.Driver"
                        url="jdbc:mysql://[ip]:[port]/[db명]?zeroDateTimeBehavior=convertToNull"
                        username="[username]" password="[password]"
                        loginTimeout="10" maxActive="50"
                        maxIdle="10" maxWait="-1" />
</Context> 


<Resource name="jdbc/oracle" auth="Container" type="javax.sql.DataSource"
    driverClassName="oracle.jdbc.OracleDriver"
    url="jdbc:oracle:thin:@DB_IP:DB_PORT:DB_SID"
    username="아이디" password="비밀번호" maxTotal="20" maxIdle="10" />


Note that the resource name (here, jdbc/EmployeeDB) must match the value specified in the web application deployment descriptor.

This example assumes that you are using the HypersonicSQL database JDBC driver. Customize the driverClassName and driverName parameters to match your actual database's JDBC driver and connection URL.

The configuration properties for Tomcat's standard data source resource factory (org.apache.tomcat.dbcp.dbcp2.BasicDataSourceFactory) are as follows:

  • driverClassName - Fully qualified Java class name of the JDBC driver to be used.
  • username - Database username to be passed to our JDBC driver.
  • password - Database password to be passed to our JDBC driver.
  • url - Connection URL to be passed to our JDBC driver. (For backwards compatibility, the property driverName is also recognized.)
  • initialSize - The initial number of connections that will be created in the pool during pool initialization. Default: 0
  • maxTotal - The maximum number of connections that can be allocated from this pool at the same time. Default: 8
  • minIdle - The minimum number of connections that will sit idle in this pool at the same time. Default: 0
  • maxIdle - The maximum number of connections that can sit idle in this pool at the same time. Default: 8
  • maxWaitMillis - The maximum number of milliseconds that the pool will wait (when there are no available connections) for a connection to be returned before throwing an exception. Default: -1 (infinite)

Some additional properties handle connection validation:

  • validationQuery - SQL query that can be used by the pool to validate connections before they are returned to the application. If specified, this query MUST be an SQL SELECT statement that returns at least one row.
  • validationQueryTimeout - Timeout in seconds for the validation query to return. Default: -1 (infinite)
  • testOnBorrow - true or false: whether a connection should be validated using the validation query each time it is borrowed from the pool. Default: true
  • testOnReturn - true or false: whether a connection should be validated using the validation query each time it is returned to the pool. Default: false

The optional evictor thread is responsible for shrinking the pool by removing any connections which are idle for a long time. The evictor does not respect minIdle. Note that you do not need to activate the evictor thread if you only want the pool to shrink according to the configured maxIdle property.

The evictor is disabled by default and can be configured using the following properties:

  • timeBetweenEvictionRunsMillis - The number of milliseconds between consecutive runs of the evictor. Default: -1 (disabled)
  • numTestsPerEvictionRun - The number of connections that will be checked for idleness by the evictor during each run of the evictor. Default: 3
  • minEvictableIdleTimeMillis - The idle time in milliseconds after which a connection can be removed from the pool by the evictor. Default: 30*60*1000 (30 minutes)
  • testWhileIdle - true or false: whether a connection should be validated by the evictor thread using the validation query while sitting idle in the pool. Default: false

Another optional feature is the removal of abandoned connections. A connection is called abandoned if the application does not return it to the pool for a long time. The pool can close such connections automatically and remove them from the pool. This is a workaround for applications leaking connections.

The abandoning feature is disabled by default and can be configured using the following properties:

  • removeAbandoned - true or false: whether to remove abandoned connections from the pool. Default: false
  • removeAbandonedTimeout - The number of seconds after which a borrowed connection is assumed to be abandoned. Default: 300
  • logAbandoned - true or false: whether to log stack traces for application code which abandoned a statement or connection. This adds serious overhead. Default: false

Finally there are various properties that allow further fine tuning of the pool behaviour:

  • defaultAutoCommit - true or false: default auto-commit state of the connections created by this pool. Default: true
  • defaultReadOnly - true or false: default read-only state of the connections created by this pool. Default: false
  • defaultTransactionIsolation - This sets the default transaction isolation level. Can be one of NONEREAD_COMMITTEDREAD_UNCOMMITTEDREPEATABLE_READSERIALIZABLE. Default: no default set
  • poolPreparedStatements - true or false: whether to pool PreparedStatements and CallableStatements. Default: false
  • maxOpenPreparedStatements - The maximum number of open statements that can be allocated from the statement pool at the same time. Default: -1 (unlimited)
  • defaultCatalog - The name of the default catalog. Default: not set
  • connectionInitSqls - A list of SQL statements run once after a Connection is created. Separate multiple statements by semicolons (;). Default: no statement
  • connectionProperties - A list of driver specific properties passed to the driver for creating connections. Each property is given as name=value, multiple properties are separated by semicolons (;). Default: no properties
  • accessToUnderlyingConnectionAllowed - true or false: whether accessing the underlying connections is allowed. Default: false

For more details, please refer to the commons-dbcp documentation.


만약 다른 도메인이나 서브 도메인이 생성되어야 한다면

server.xml에 신규 HOST를 추가한다.

<Host name="localhost" appBase="webapps" unpackWARs="true" autoDeploy="true">
    기존 도메인 내용이 있음
</Host>
<!-- 신규로 추가되는 서브 도메인 -->
<Host name="test.anaconda.pe.kr" appBase="webapps" unpackWARs="true" autoDeploy="true">
</Host>


그리고 /conf/Catalina/폴더 아래에 test.anaconda.pe.kr라는 폴더를 만든다.

/conf/Catalina/test.anaconda.pe.kr와 같은 폴더를 가진다.

그리고 그 아래에 ROOT.xml파일을 만들고 context 정보를 넣어주면 된다.


XML 없이 Java만 사용해서 설정하기

출처 : http://breadmj.wordpress.com/2013/08/04/spring-3-only-java-config-without-xml/


Spring과의 첫만남

내가 스프링을 처음으로 접한 것은 스프링 프레임워크의 버전이 3.0 으로 막 올라간지 얼마 안되었을 때였다.

대략 3년정도 된 것 같은데 그때 작성했던 코드들을 아직도 사용하고 있다. 물론 자바 로직은 기능 변화에 맞추어 많이 변경되었다. 하지만 맨 처음에 작성했던 스프링 설정은 큰 변화없이 지금까지 사용중이다. 어떻게 보면 조금이라도 더 나은 설정을 위한 노력이 부족했다고 생각할 수도 있고 아니면 그 반대로 스프링을 사용했기에 (3년전의 내 코딩 실력에도 불구하고) 지금까지 안정적으로 유지했다고 생각할 수도 있다.

Spring 설정은 어플리케이션의 뼈대를 이룬다

스프링을 사용한다면 스프링 설정은 그 어플리케이션의 뼈대를 이루게 된다. 조금 억지를 넣어서 말해보자면 스프링 설정이 곧 어플리케이션 설계라고 할 수도 있다. 그렇기에 현재 운영중인 어플리케이션의 기반을 건드리는 것이 무서운 점도 어느정도 있었다. 스프링 설정이 조금 알아보기 힘들다거나, 미관상(?) 지저분해 보인다거나, 사소한 실수가 보이더라도 운영이 불가능한 상태가 아닌 이상 웬만하면 건드리지 않았다. 그러다보니 기능은 점점 늘어나는데 설정은 지저분하게 남아있어 변경하기 힘들고, 하위 호환성을 엄청 신경쓰기로 유명한 스프링의 버전을 올리는 것도 꺼려지는 지경에 이르렀다.

공포의 applicationContext.xml

그러나 과연 스프링 설정을 바꾸기 고민되는 것이, 설정 파일을 지저분하게 만들어놓은 것 때문만일까? 물론 아니니까 이 글을 썼겠지. 나는 그 이유의 반 이상이 스프링 설정에 XML 을 이용했기 때문이라고 생각한다.

스프링을 맨 처음 접했을 때, applicationContext.xml 이라는 무시무시한 이름의 파일안에 더 무시무시한 빈 설정들을 보고 식겁했던 기억이 난다. 뭐 무슨 컨버전 어쩌고.. 핸들러.. 리졸버.. 난 그것들이 무엇이고 왜 필요하며, 이 설정들을 스프링이 어떻게 읽어가는지 이해하는데까지 1년 이상의 시간이 걸렸다. 물론 그것들을 완벽하게 이해하지 못해도 어느정도 사용가능하긴 하다. 뭐든 다 삽질하면서 배우는거니까.

왜 꼭 xml 로 설정해야 하죠?

각설하고, 나와 비슷한 생각들을 많이들 했던 것 같다. 오래 전부터 스프링 설정을 XML 이 아닌 오직 Java만으로 할 수 있도록 이런저런 노력들이 이어져왔다. 그것이 근래 들어서 Servlet 3.0 스펙이 확정되고, 또 그 스펙을 구현한 톰캣 7.0 이 나오면서 꽃을 피웠다. xml 설정 단 한줄도 없이 자바만으로 스프링을 사용할 수 있게 된 것이다.

Java로 설정하면 뭐가 좋을까?

그렇다면 XML에 비해 Java만을 사용해서 설정하는 것이 어떤 이득이 있을까? 개인적인 견해도 섞여있다.

  1. 설정 파일을 따로 유지할 필요가 없다. 그냥 자바 클래스이다. 찾기 쉽다.
  2. 보다 명료하다. 어떤 것들이 빈으로 만들어지는지 파악하기 쉽다.
  3. IDE의 자동완성 기능을 사용할 수 있다. 자바 코드이기 때문이다. 그래서 작성과 수정이 빠르다.
  4. 어플리케이션 로직과 설정 코드를 동일한 언어로 만들 수 있다. 한 언어만 쓰는게 간편하니 좋다.
  5. 설정 코드에 break point 를 걸어서 디버깅할 수 있다.

이 정도만 해도 충분히 자바 코드를 이용해서 설정하는 의미가 있다. 나는 개인적으로 XML 로 만들어져있는 스프링 설정 파일을 읽거나 수정하는 것이 고역이었다. 그에 반해 자바 코드로 설정을 하니 이렇게 좋을 수가 없었다. 특히나 스프링을 처음으로 접해보는 초심자라면 XML 설정보다는 자바 설정을 이용하는 것이 더더욱 좋겠다.

그래서 뭘 어떻게 하는거라고?

서론은 이쯤하고, 이제 Java 를 이용해서 스프링 설정을 하는 방법을 알아보자. 어플리케이션은 서블릿을 만든다고 가정한다. 스프링을 이용해서 주로 서블릿을 많이 만들고 또 사용법이 다 비슷비슷하니, 다른 형태의 어플리케이션을 작성한다 하더라도 충분히 참고할만하다. 여기 나오는 모든 코드는 나의 GitHub 프로젝트 중 SpringMVCTest 프로젝트에 다 포함되어있다.

목표는 다음과 같다.

  • Spring 의 application context 설정들을 Java 로 바꾼다. root-context.xml, servlet-context.xml 요런것들 말이다.
  • web.xml 설정을 Java 로 바꾼다.

자, 그럼 시작해보자.

첫번째, pom.xml 설정 (메이븐 설정)

프로젝트 의존성 관리는 메이븐을 이용한다고 가정한다.

1. Spring 버전 3.1 이상 사용한다. 나는 현재 최신버전인 3.2.2.RELEASE 를 사용했다. 

<!-- Spring -->
<dependency>
  <groupId>org.springframework</groupId>
  <artifactId>spring-context</artifactId>
  <version>3.2.2.RELEASE</version>
</dependency>
<dependency>
  <groupId>org.springframework</groupId>
  <artifactId>spring-webmvc</artifactId>
  <version>3.2.2.RELEASE</version>
</dependency> 


2. servlet-api 버전 3.0 이상 사용한다. web.xml 을 없애기 위해서는 서블릿 3.0 이상의 스펙이 필요하다. 

<!-- use Servlet 3.0 spec -->
<!-- Java Config 를 사용하기 위해서는 서블릿 3.0 이상의 스펙이 필요하다. -->
<!-- 톰캣의 경우 7.0 이상을 사용해야 한다. -->
<dependency>
  <groupId>javax.servlet</groupId>
  <artifactId>javax.servlet-api</artifactId>
  <version>3.0.1</version>
  <scope>provided</scope>
</dependency> 


3. Spring 버전 3.1.x 라면 cglib 을 dependency 에 추가한다. @Configuration 어노테이션을 사용하기 위해서 필요하다. 만약 추가해주지 않는다면 런타임 에러가 발생할 것이다. 스프링 버전이 3.2.x 라면 Spring 에 cglib 이 포함되어 있으므로 선언할 필요없다. 

<!-- @Configuration 어노테이션을 쓰기 위해서는 cglib 이 필요하다. -->
<!-- Spring 버전 3.2 이상부터 Spring 에 cglib 이 포함되므로, 버전에 따라 포함할지 말지 결정한다. -->
<dependency>
  <groupId>cglib</groupId>
  <artifactId>cglib</artifactId>
  <version>2.2.2</version>
  <scope>runtime</scope>
</dependency> 


4. maven-war-plugin 에 아래와 같이 failOnMissingWebXml 을 false 로 설정한다. 이 설정이 없다면 web.xml 파일이 존재하지 않는다고 투덜댈 것이다. 

<plugin>

  <groupId>org.apache.maven.plugins</groupId>
  <artifactId>maven-war-plugin</artifactId>
  <version>2.3</version>
  <configuration>
    <failOnMissingWebXml>false</failOnMissingWebXml>
  </configuration>
</plugin>


두번째, root-context.xml 없애기

root-context 에는 주로 프로퍼티 홀더 설정이나 datasource 같이 여러 서블릿에서 공통으로 사용할 설정들이 들어간다. 서블릿을 하나만 띄운다면 root context 와 servlet context 를 굳이 구분할 필요는 없지만, 이 내용은 논점에서 벗어나므로, 일단 root context 와 servlet context 가 구분되어 있다고 가정한다. 하지만 두 context 설정을 바꾸는 것은 근본적으로 동일하다.

그럼 아래 코드를 보자.

// import..

/**
 * 루트 설정용 클래스.
 * 이 클래스는 스프링의 root-context.xml 의 역할을 대신한다.
 * @author mj
 *
 */
@Configuration
public class RootConfig {
 
    @Value("${jdbc.driverClassName}")
    private String jdbcDriverClassName;
 
    @Value("${jdbc.url}")
    private String jdbcUrl;
 
    @Value("${jdbc.username}")
    private String jdbcUsername;
 
    @Value("${jdbc.password}")
    private String jdbcPassword;
 
    private static final String APP_CONFIG_FILE_PATH = "application.xml";
 
    /**
     * 프로퍼티 홀더는 다른 빈들이 사용하는 프로퍼티들을 로딩하기 때문에, static 메소드로 실행된다.
     * 다른 일반 빈들이 만들어지기전에 먼저 만들어져야 한다.
     * @return
     */
    @Bean
    public /* static 메소드에요! */ static PropertyPlaceholderConfigurer propertyPlaceholderConfigurer()
    {
        PropertyPlaceholderConfigurer ppc = new PropertyPlaceholderConfigurer();
        ppc.setLocations(new Resource[] { new ClassPathResource(APP_CONFIG_FILE_PATH) });
        return ppc;
    }
 
    @Bean
    public DataSource dataSource()
    {
        BasicDataSource dataSource = new BasicDataSource();
        dataSource.setDriverClassName(this.jdbcDriverClassName);
        dataSource.setUrl(this.jdbcUrl);
        dataSource.setUsername(this.jdbcUsername);
        dataSource.setPassword(this.jdbcPassword);
        return dataSource;
    }
 
    // 기타 다른 bean 설정들..
}


  • 클래스를 하나 만든다. 이름은 root context 라는 것을 알아볼 수 있는 적절한 이름이면 된다.
  • 클래스에 @Configuration 어노테이션을 붙여준다. 설정용 클래스라는 것을 스프링에게 알려주는 역할이다.
  • root-context.xml 에 bean 을 등록하듯이, 빈으로 만들어지길 원하는 오브젝트를 리턴하는 메소드를 만든다. 이 메소드 내에서 빈에다가 필요한 설정을 해주고, 그것을 리턴해주면 된다.
  • 빈으로 등록되길 원하는 메소드들에는 @Bean 어노테이션을 붙여준다. 이 어노테이션이 있어야 스프링이 그 메소드들을 실행해서 빈으로 만든다.
  • property placeholder 처럼, 다른 빈보다 먼저 등록되어야 하는 것들은 static 메소드로 만든다. java 에서 static 의 역할이 무엇인지 생각해본다면 static 을 붙여주는 것이 아주 자연스럽다.

세번째, servlet-context.xml 없애기

// import..

 
/**
 * MVC 설정용 클래스.
 * 이 클래스는 스프링의 sevlet-context.xml 의 역할을 대신한다.
 * @author mj
 */
@Configuration
@EnableWebMvc
@EnableAsync // @Async 어노테이션을 사용하기 위함
@ComponentScan(
    basePackages="com.nethru.test",
    excludeFilters=@ComponentScan.Filter(Configuration.class)
)
public class MvcConfig extends WebMvcConfigurerAdapter // 인터셉터를 추가하기 위해 WebMvcConfigurerAdapter 를 상속한다
{
    @Bean
    public ViewResolver viewResolver()
    {
        InternalResourceViewResolver resolver = new InternalResourceViewResolver();
        resolver.setPrefix("/WEB-INF/views/");
        resolver.setSuffix(".jsp");
        return resolver;
    }
 
    /**
     * 인터셉터 추가
     */
    @Override
    public void addInterceptors(InterceptorRegistry registry)
    {
        registry.addInterceptor(new CorsInterceptor());
    }
}

  • root context와 마찬가지로 적절한 이름의 클래스를 만든 후, @Configuration 어노테이션을 붙여준다.
  • mvc:annotation-driven 은 @EnableWebMvc 어노테이션이 대신한다. 마찬가지로 task:annotation-driven 은 @EnableAsync 가 대신한다. 또한 트랜잭션이나 기타 다른 기능들을 이렇게 어노테이션 하나로 활성화시킬 수 있다.
  • context:component-scan 은 @ComponentScan 어노테이션이 대신한다. xml과 마찬가지로 basePackage 와 filter 를 지정할 수 있다.
  • 빈으로 등록될 오브젝트를 리턴하는 메소드를 만든 후, @Bean 어노테이션을 붙여준다. 위 예제에서는 뷰 리졸버를 빈으로 등록하고 있다.
  • 인터셉터를 등록하기 위해서는 추가적인 작업이 필요하다. WebMvcConfigurerAdapter 라는 스프링 클래스를 상속한 후, addInterceptors() 메소드를 override 한다. 메소드 내에서 필요한 인터셉터와 매핑을 지정해주면 된다.

네번째, web.xml 없애기

일단 코드부터 보자.

// import..

 
/**
 * WebApplicationInitializer 를 상속하면, 서블릿 컨테이너가 실행될 때 onStartup() 메소드가 자동으로 호출된다.
 * 이 클래스는 web.xml 의 역할을 대신하거나 보충한다.
 * @author mj
 *
 */
public class Initializer implements WebApplicationInitializer
{
    @Override
    public void onStartup(ServletContext servletContext)
            throws ServletException
    {
        AnnotationConfigWebApplicationContext rootContext = new AnnotationConfigWebApplicationContext();
        rootContext.register(RootConfig.class);
        servletContext.addListener(new ContextLoaderListener(rootContext));
 
        this.addDispatcherServlet(servletContext);
        this.addUtf8CharacterEncodingFilter(servletContext);
    }
 
    /**
     * Dispatcher Servlet 을 추가한다.
     * CORS 를 가능하게 하기 위해서 dispatchOptionsRequest 설정을 true 로 한다.
     * @param servletContext
     */
    private void addDispatcherServlet(ServletContext servletContext)
    {
        AnnotationConfigWebApplicationContext applicationContext = new AnnotationConfigWebApplicationContext();
        applicationContext.getEnvironment().addActiveProfile("production");
        applicationContext.register(MvcConfig.class);
 
        ServletRegistration.Dynamic dispatcher = servletContext.addServlet("dispatcher", new DispatcherServlet(applicationContext));
        dispatcher.setLoadOnStartup(1);
        dispatcher.addMapping("/");
        dispatcher.setInitParameter("dispatchOptionsRequest", "true"); // CORS 를 위해서 option request 도 받아들인다.
    }
 
    /**
     * UTF-8 캐릭터 인코딩 필터를 추가한다.
     * @param servletContext
     */
    private void addUtf8CharacterEncodingFilter(ServletContext servletContext)
    {
        FilterRegistration.Dynamic filter = servletContext.addFilter("CHARACTER_ENCODING_FILTER", CharacterEncodingFilter.class);
        filter.setInitParameter("encoding", "UTF-8");
        filter.setInitParameter("forceEncoding", "true");
        filter.addMappingForUrlPatterns(null, false, "/*");
    }
}

  • WebApplicationInitializer 인터페이스를 구현한 클래스를 만든다. 이 클래스는 web.xml의 역할을 대신할 클래스이다.
  • onStartup() 메소드를 override 한다. 이 메소드는 서블릿 컨테이너가 실행될 때 자동으로 호출된다. 이 부분이 Servlet API 3.0 이상 필요한 부분이다. 자세한 메커니즘은 Spring 의 WebApplicationInitialzer javadoc 을 참고한다.
  • 필요한 각종 설정을 Java code 로 구현한다. 예를 들면 DispatcherServlet 이나 CharacterEncodingFilter 같은 것들을 등록해주는 일이다. 알다시피 이것들은 기존에 web.xml 에 기술하던 것들이었다.

결론

  •  한번 java 로 스프링 설정을 해보고나면 xml 설정으로 돌아가기 힘들것이다.
  • 생각보다 어렵지 않다. 익숙하지 않아서 그렇지 예제 코드들을 보고 Spring 문서들을 읽어보면 할 수 있다.


button::-moz-focus-inner,
input[type=reset]::-moz-focus-inner,
input[type=button]::-moz-focus-inner,
input[type=submit]::-moz-focus-inner,
input[type=file]>input[type=button]::-moz-focus-inner{padding:0; border:0}

$('form').on('submit', function() {

    $.mobile.activePage.find('.ui-btn-active').removeClass('ui-btn-active');

    // ajax - process

    return false;

});

반응형 웹 관련

http://helloworld.naver.com/helloworld/81480


Responsive 웹 디자인이 적용된 사이트가 정리된 곳

http://mediaqueri.es/

디바이스별 미디어 쿼리 정리

속성으로 구분

  • 스마트폰 (가로/세로):
    @media only screen and (min-device-width : 320px) and (max-device-width : 480px) {
    /* Styles */
    }
  • 스마트폰 (가로):
    @media only screen and (min-width : 321px) {
    /* Styles */
    }
  • 스마트폰 (세로):
    @media only screen and (max-width : 320px) {
    /* Styles */
    }
  • iPad (가로/세로):
    @media only screen and (min-device-width : 768px) and (max-device-width : 1024px) {
    /* Styles */
    }
  • iPad (가로):
    @media only screen and (min-device-width : 768px) and (max-device-width : 1024px) and (orientation : landscape) {
    /* Styles */
    }
  • iPad (세로):
    @media only screen and (min-device-width : 768px) and (max-device-width : 1024px) and (orientation : portrait) {
    /* Styles */
    }
  • 데스크탑 브라우저 (가로):
    @media only screen and (min-width : 1224px) {
    /* Styles */
    }
  • 큰 모니터:
    @media only screen and (min-width : 1824px) {
    /* Styles */
    }
  • iPhone4와 같은 높은 해상도:
    @media only screen and (-webkit-min-device-pixel-ratio : 1.5), only screen and (min-device-pixel-ratio : 1.5) {
    /* Styles */
    }

파일로 구분

  • 스마트폰 (가로/세로):
    <link rel="stylesheet" href="smartphone.css"
    media="only screen and (min-device-width : 320px) and (max-device-width : 480px)">
  • 스마트폰 (가로):
    <link rel="stylesheet" href="smartphone-landscape.css"
    media="only screen and (min-width : 321px)">
  • 스마트폰 (세로):
    <link rel="stylesheet" href="smartphone-portrait.css"
    media="only screen and (max-width : 320px)">
  • iPad (가로/세로):
    <link rel="stylesheet" href="ipad.css"
    media="only screen and (min-device-width : 768px) and (max-device-width : 1024px)">
  • iPad (가로):
    <link rel="stylesheet" href="ipad-landscape.css"
    media="only screen and (min-device-width : 768px) and (max-device-width : 1024px) and (orientation : landscape)">
  • iPad (세로):
    <link rel="stylesheet" href="ipad-portrait.css"
    media="only screen and (min-device-width : 768px) and (max-device-width : 1024px) and (orientation : portrait)">
  • 데스크탑 브라우저 (가로):
    <link rel="stylesheet" href="widescreen.css"
    media="only screen and (min-width : 1224px)">
  • 큰 모니터:
    <link rel="stylesheet" href="widescreen.css"
    media="only screen and (min-width : 1824px)">
  • iPhone4와 같은 높은 해상도:
    <link rel="stylesheet" href="iphone4.css"
    media="only screen and (-webkit-min-device-pixel-ratio : 1.5), only screen and (min-device-pixel-ratio : 1.5)">

출처: http://www.stuffandnonsense.co.uk/blog/about/hardboiled_css3_media_queries/

참고 : http://json-lib.sourceforge.net/
         http://json-lib.sourceforge.net/snippets.html

출처 : http://redtrain.tistory.com/819


* json-lib library 추가 (Maven)

<dependency>
<groupId>net.sf.json-lib</groupId>
<artifactId>json-lib</artifactId>
<version>2.4</version>
<classifier>jdk15</classifier>
</dependency>
<dependency>
<groupId>xom</groupId>
<artifactId>xom</artifactId>
<version>1.2.5</version>
</dependency> 


Introduction


JSON-lib (http://json-lib.sourceforge.net/)는 자바에서 beans, maps, collections, array 그리고 XML을 JSON 으로 변환하기 위해 사용하는 자바 라이브러리이다. 


Download


다음의 경로에서 다운로드 한다.


Dependencies


주의해야할 점은 common-lang 최신 버전(3.3.1)을 사용할 경우 org.apache.commons.lang.exception.NestableRuntimeException 이 발생하게 된다. 위의 경로에서 패키지를 다운 받아 등록하거나 pom.xml에 아래의 Dependency를 추가한다.
  1. <dependency>  
  2.     <groupId>commons-lang</groupId>  
  3.     <artifactId>commons-lang</artifactId>  
  4.     <version>2.6</version>  
  5. </dependency>  
  6. <dependency>  
  7.     <groupId>commons-beanutils</groupId>  
  8.     <artifactId>commons-beanutils</artifactId>  
  9.     <version>1.8.3</version>  
  10. </dependency>  
  11. <dependency>  
  12.     <groupId>commons-collections</groupId>  
  13.     <artifactId>commons-collections</artifactId>  
  14.     <version>3.2.1</version>  
  15. </dependency>  
  16. <dependency>  
  17.     <groupId>commons-logging</groupId>  
  18.     <artifactId>commons-logging</artifactId>  
  19.     <version>1.1.1</version>  
  20. </dependency>  
  21. <dependency>  
  22.     <groupId>net.sf.ezmorph</groupId>  
  23.     <artifactId>ezmorph</artifactId>  
  24.     <version>1.0.6</version>  
  25. </dependency>  


How to use json-lib


Array and Collection to JSON : 

  1. import java.util.ArrayList;  
  2. import java.util.List;  
  3. import junit.framework.TestCase;  
  4. import net.sf.json.JSONArray;  
  5.   
  6. public class JSONLibTest extends TestCase {  
  7.   
  8.     public void testArrayCollection() {  
  9.         boolean[] boolArray = new boolean[]{true,false};    
  10.         JSONArray jsonArray = JSONArray.fromObject( boolArray );    
  11.         System.out.println( "boolArray : " + jsonArray );  
  12.           
  13.         List<String> list = new ArrayList<String>();    
  14.         list.add("1");  
  15.         list.add("second");  
  16.         list.add("셋");  
  17.           
  18.         JSONArray jsonArray1 = JSONArray.fromObject( list );    
  19.         System.out.println( "jsonArray1:" + jsonArray1 );  
  20.           
  21.         JSONArray jsonArray2 = JSONArray.fromObject( "['하나','2','third']" );    
  22.         System.out.println( "jsonArray2:" + jsonArray2 );  
  23.     }  
  24. }  
  25.   
  26. //boolArray : [true,false]  
  27. //jsonArray1:["1","second","셋"]  
  28. //jsonArray2:["하나","2","third"]  


Bean and Map to JSON : 

  1. //Sample Bean  
  2. import net.sf.json.JSONFunction;  
  3.   
  4. public class TestBean {  
  5.     private String name = "json";  
  6.     private int num = 1;  
  7.     private char[] options = new char[]{ 'k''o''r' };  
  8.     private String func1 = "function(i) { return this.options[i]; }";  
  9.     private JSONFunction func2 = new JSONFunction(new String[]{"i"},"return this.options[i];");  
  10.       
  11.     public String getName() {  
  12.         return name;  
  13.     }  
  14.     public void setName(String name) {  
  15.         this.name = name;  
  16.     }  
  17.     public int getNum() {  
  18.         return num;  
  19.     }  
  20.     public void setNum(int num) {  
  21.         this.num = num;  
  22.     }  
  23.     public char[] getOptions() {  
  24.         return options;  
  25.     }  
  26.     public void setOptions(char[] options) {  
  27.         this.options = options;  
  28.     }  
  29.     public String getFunc1() {  
  30.         return func1;  
  31.     }  
  32.     public void setFunc1(String func1) {  
  33.         this.func1 = func1;  
  34.     }  
  35.     public JSONFunction getFunc2() {  
  36.         return func2;  
  37.     }  
  38.     public void setFunc2(JSONFunction func2) {  
  39.         this.func2 = func2;  
  40.     }  
  41. }  
  1. import java.util.HashMap;  
  2. import java.util.Map;  
  3.   
  4. import junit.framework.TestCase;  
  5. import net.sf.json.JSONObject;  
  6.   
  7. public class JSONLibTest extends TestCase {  
  8.     public void testBeanMaps() {  
  9.         Map<String, Object> map = new HashMap<String, Object>();    
  10.         map.put( "string""jin" );    
  11.         map.put( "bool", Boolean.TRUE );    
  12.         map.put( "int"new Integer(1) );    
  13.         map.put( "array"new String[]{"a","b"} );    
  14.         map.put( "function""function(i){ return this.arr[i]; }" );    
  15.           
  16.         JSONObject jsonObjectMap = JSONObject.fromObject( map );    
  17.         System.out.println( "jsonObjectMap:" +  jsonObjectMap );  
  18.           
  19.         JSONObject jsonObjectBean = JSONObject.fromObject( new TestBean() );    
  20.         System.out.println( "jsonObjectBean:" +  jsonObjectBean );  
  21.     }  
  22. }  
  23.   
  24. //jsonObjectMap:{"int":1,"string":"jin","bool":true,"function":function(i){ return this.arr[i]; },"array":["a","b"]}  
  25.   
  26. //jsonObjectBean:{"func1":function(i) { return this.options[i]; },"func2":function(i){ return this.options[i]; },"name":"json","num":1,"options":["k","o","r"]}  


JSON to Beans : 

  1. import java.lang.reflect.InvocationTargetException;  
  2. import java.util.List;  
  3.   
  4. import junit.framework.TestCase;  
  5. import net.sf.json.JSONArray;  
  6. import net.sf.json.JSONObject;  
  7.   
  8. import org.apache.commons.beanutils.PropertyUtils;  
  9.   
  10. public class JSONLibTest extends TestCase {  
  11.     @SuppressWarnings("unchecked")  
  12.     public void testJsonToBeans() throws   
  13.             IllegalAccessException, InvocationTargetException, NoSuchMethodException {  
  14.   
  15.         String strJson = "{\"func1\":function(i) { return this.options[i]; },\"func2\":function(i){ return this.options[i]; },\"name\":\"json\",\"num\":1,\"options\":[\"k\",\"o\",\"r\"]}";  
  16.           
  17.         JSONObject jsonObjectJsonToBeans = JSONObject.fromObject( strJson );  
  18.         Object beans = JSONObject.toBean( jsonObjectJsonToBeans );   
  19.           
  20.         assertEquals( jsonObjectJsonToBeans.get( "name" ),   
  21.                         PropertyUtils.getProperty( beans, "name" ) );   
  22.         assertEquals( jsonObjectJsonToBeans.get( "num" ),   
  23.                         PropertyUtils.getProperty( beans, "num" ) );   
  24.         assertEquals( jsonObjectJsonToBeans.get( "func1" ),   
  25.                         PropertyUtils.getProperty( beans, "func1" ) );   
  26.         assertEquals( jsonObjectJsonToBeans.get( "func2" ),   
  27.                         PropertyUtils.getProperty( beans, "func2" ) );   
  28.   
  29.         @SuppressWarnings("deprecation")  
  30.         List<String> expected = JSONArray.toList(jsonObjectJsonToBeans.getJSONArray("options"));  
  31.         assertEquals( expected, (List<String>) PropertyUtils.getProperty(beans, "options") );  
  32.     }     
  33. }  


Json to XML AND XML to JSON : 

XMLSerializer.write()와 XMLSerializer.read() 를 사용하여 XML을 JSON으로 JSON을 XML로 변환할 수 있다.

  1. import junit.framework.TestCase;  
  2. import net.sf.json.JSONArray;  
  3. import net.sf.json.JSONObject;  
  4. import net.sf.json.xml.XMLSerializer;  
  5.   
  6. public class JSONLibTest extends TestCase {  
  7.     public void testXML() {  
  8.         XMLSerializer xmlSerializer = new XMLSerializer();  
  9.   
  10.         String strXml1 = "<?xml version=\"1.0\" encoding=\"utf-8\"?><book>" +   
  11.                         "<title>XML To JSON</title><author>json-lib</author></book>";  
  12.   
  13.         JSONObject jsonObject1 = (JSONObject) xmlSerializer.read(strXml1);    
  14.         System.out.println( jsonObject1 );  
  15.           
  16.         JSONObject jsonObject2 = new JSONObject( true );  
  17.         String strXml2 = xmlSerializer.write( jsonObject2 );  
  18.         System.out.println( strXml2 );  
  19.   
  20.         JSONArray jsonObject3 = JSONArray.fromObject("[1,2,3]");    
  21.         String strXml3 = xmlSerializer.write( jsonObject3 );  
  22.         System.out.println( strXml3 );  
  23.           
  24.         System.out.println( "jsonObject1(json to xml):"+ xmlSerializer.read(strXml1) );  
  25.   
  26.         System.out.println( "jsonObject2(json to xml):"+ xmlSerializer.read(strXml2) );  
  27.           
  28.         System.out.println( "jsonObject3(json to xml):"+ xmlSerializer.read(strXml3) );  
  29.     }     
  30. }  
  31.   
  32. //jsonObject1(xml to json):{"title":"XML To JSON","author":"json-lib"}  
  33. //jsonObject2(xml to json):<?xml version="1.0" encoding="UTF-8"?>  
  34. //<o null="true"/>  
  35.   
  36. //jsonObject3(xml to json):<?xml version="1.0" encoding="UTF-8"?>  
  37. //<a><e type="number">1</e><e type="number">2</e><e type="number">3</e></a>  
  38.   
  39. //jsonObject1(json to xml):{"title":"XML To JSON","author":"json-lib"}  
  40. //jsonObject2(json to xml):null  
  41. //jsonObject3(json to xml):["1","2","3"]  


그런데 위의 소스를 돌려보면 java.lang.NoClassDefFoundError: nu/xom/Element 를 던진다.

json-lib 사이트에서 살펴보면 이와 관련된 언급이 없는 것 같은데...


라이브러리를 하나 추가해야 한다.

XOM(XML Object Model) 라이브러리를 추가해야한다. 여기서 다운로드 할 수 있다.


위의 코드를 돌려보면서 발생할 수 있는 Exception은 다음과 같다.

  • java.lang.NoClassDefFoundError
    • 위의 의존성 패키지에서 누락된게 있는지 확인해본다.
  • org.apache.commons.lang.exception.NestableRuntimeException
    • 최신버전 (commons-lang3-3.1.jar) 사용시에 오류 발생
  • java.lang.NoClassDefFoundError: nu/xom/Element
    • XML을 사용할 때 라이브러리를 추가한다.


출처 : http://willygwu2003.blog.me/130171432318

참고 : http://docs.spring.io/spring-batch/reference/html/

다음의 내용은 Spring Batch 2.0 Documentation의 중에 기본적인 내용을 요약한 것입니다.


1. Job Configuration 


1.1. Restartability


restartable='false'로 설정된 Job은 다시 재 실행 될 수 없습니다.

일반적으로 Job은 실패한 시점에서 다시 재 시작을 할 수 있으야 하나, 어떤 경우에는 어떤 시점에서 재 시작을 해야하는지 알 수 없는 경우가 있습니다. 이 경우에는 다음과 같이 설정하여 재시작을 원천적으로 막는 방법이 있습니다.

일반적으로, 재시작 할 수 없는 Job이 실패한 경우에는 관리자 또는 개발자에 의해 수동적으로 처리하게 됩니다.

<job id="footballJob" restartable="false">
    ...
</job>

1.2. JobExecutionListener


Job이 실행 lifecycle 이벤트를 받아 커스텀 로직을 정의할 필요가 있을때, 다음의 리스너를 등록하면 유용합니다.

Job이 성공 또는 실패에 상관없이 afterJob은 실행됩니다.

public interface JobExecutionListener {

    void beforeJob(JobExecution jobExecution);

    void afterJob(JobExecution jobExecution);

}
<job id="footballJob">
    <step id="playerload"          parent="s1" next="gameLoad"/>
    <step id="gameLoad"            parent="s2" next="playerSummarization"/>
    <step id="playerSummarization" parent="s3"/>
    <listeners>
        <listener ref="sampleListener"/>
    </listeners>
</job>


1.3. Configuring JobRepository


Database Repository 


<job-repository id="jobRepository"
    data-source="dataSource"
    transaction-manager="transactionManager"
    isolation-level-for-create="SERIALIZABLE"
    table-prefix="BATCH_"
 max-varchar-length="1000"
/>


In-Memory Repository


In-Memory Repository는 다음의 단점을 가지고 있음으로, 실제 Production 환경에서는 Database Repository가 주 설정 방법입니다.


- 재 시작된 경우 모든 상태 정보가 없어집니다.

- 같은 JobParameters 값을 가진 두개의 JobInstance가 동시에 실행된다는 보장이 없습니다.

- Multi-threaded Job 환경에서는 적합하지 않습니다.

<bean id="jobRepository" 
  class="org.springframework.batch.core.repository.support.MapJobRepositoryFactoryBean">
    <property name="transactionManager" ref="transactionManager"/>
</bean>


2. Step Configuration 


2.1. Commit Interval


다음은 각 트랜잭션에서 10개의 아이템이 처리되도록 설정하였습니다. 트랜잭션이 시작되면, ItemReader가 아이템을 일고, readCount가 10이되면 ItemWriter에 아이템 리스트가 전달됩니다. 그리고 트랜잭션이 컴밋됩니다.

commit-interval='10' 설정에 의해 'Chunk' 프로세스 단위가 결정됩니다.

<job id="sampleJob">
    <step id="step1">
        <tasklet>
            <chunk reader="itemReader" writer="itemWriter" commit-interval="10"/>
        </tasklet>
    </step>
</job>


2.2. Configuring Step Restart


'start-limit'은 Step이 실패 이후 재식작 가능한 수를 통제합니다. 다음의 예에서 Step은 단 한번 실행될 수 있고 다시 실행되면 exception이 발생하게 됩니다. default 값은 Interger.MAX_VALUE 입니다.

<step id="step1">
    <tasklet start-limit="1">
        <chunk reader="itemReader" writer="itemWriter" commit-interval="10"/>
    </tasklet>
</step>

 재시작 가능한 Job에서는, 처음의 Step 실행에서 성공 또는 실패에 상관없이 항상 재 실행이 될 필요가 있습니다. 디폴트로 'COMPLETED' 상태코드의 Step은 재 실행되더라도 Skip이 됩니다.

하지만 어떤 경우에는 이미 성공한 Step이라도 다시 실행 될 필요가 있는데, 이 경우에 다음과 같이 allow-start-if-complete='true'로 설정하면 됩니다.


<step id="step1">
    <tasklet allow-start-if-complete="true">
        <chunk reader="itemReader" writer="itemWriter" commit-interval="10"/>
    </tasklet>
</step>

2.3. Configuring Skip Logic


많은 경우에 에러가 발생하였을 경우 Step이 실패하는 것이 아니라, 단순히 Skip하고 계속 진행 될 필요가 있습니다.

다음의 예는 FlatFileReader가 사용되었고 프로세스 중에 FlatFileParseException이 발행한 아이템은 Skip되도록 설정되었습니다.

또한 skip-limit=10 설정에 의해 skipCount가 10에 도달하면 해당 step은 실패하게 됩니다.

<step id="step1">
   <tasklet>
      <chunk reader="flatFileItemReader" writer="itemWriter" 
             commit-interval="10" skip-limit="10">
         <skippable-exception-classes>
            <include class="org.springframework.batch.item.file.FlatFileParseException"/>
         </skippable-exception-classes>
      </chunk>
   </tasklet>
</step>

다음은 Skippable한 Exception 처리와 그렇지 못한 Exception을 설정한 예입니다.

<include> 태그의 Exception은 Skip이 가능한 Exception이며, <exclude> 태그안의 Exception이 발생한 경우에는 Step이 실패하게 됩니다.

<step id="step1">
    <tasklet>
        <chunk reader="flatFileItemReader" writer="itemWriter" 
               commit-interval="10" skip-limit="10">
            <skippable-exception-classes>
                <include class="java.lang.Exception"/>
                <exclude class="java.io.FileNotFoundException"/>
            </skippable-exception-classes>
        </chunk>
    </tasklet>
</step>


2.4. Configuring Retry Logic


단순이 Exception이 발생한 경우은 회복가능한 Exception가 불가능한 Exception이 있습니다.

다음과 같이 데이터베이스 LOCK에 의해 실패한 경우에는 해당 아이템에 대한 처리를 Skip하는 것이 아니라 잠시 이후 다시 처리하면 성공할 확율이 높습니다. 이러한 경우에 다음과 같은 설정이 유용합니다.


<step id="step1">
   <tasklet>
      <chunk reader="itemReader" writer="itemWriter" 
             commit-interval="2" retry-limit="3">
         <retryable-exception-classes>
            <include class="org.springframework.dao.DeadlockLoserDataAccessException"/>
         </retryable-exception-classes>
      </chunk>
   </tasklet>
</step>


2.5. Controlling Rollback


일반적으로 ItemWriter의 포르세스 중에 Exception이 발생한 경우에는 Rollback이 발생합니다.

하지만, 특정 시나리오에서는 롤백이 발생하지 않기를 원하는 경우가 있습니다. 이런 경우 <no-rollback-exception-classes> 설정이 유용합니다.

<step id="step1">
   <tasklet>
      <chunk reader="itemReader" writer="itemWriter" commit-interval="2"/>
      <no-rollback-exception-classes>
         <include class="org.springframework.batch.item.validator.ValidationException"/>
      </no-rollback-exception-classes>
   </tasklet>
</step>


 ItemReader는 기본적으로 읽어온 아이템을 버퍼에 저장합니다다. 따라서, rollback이 발생하더라도 다시 아이템을 ItemReader로 부터러 읽어 올 필요가 없습니다. 하지만 , 아이템을 JMS Queue로 부터 읽어 온 경우에는 rollback이 발생하면 아이템을 다시 Queue에서 읽어와야 합니다. 즉 버퍼를 사용하지 않도록 설정하는 요소가 is-reader-transactional-queue='true' 입니다.


<step id="step1">
    <tasklet>
        <chunk reader="itemReader" writer="itemWriter" commit-interval="2"
               is-reader-transactional-queue="true"/>
    </tasklet>
</step>


다음과 같이 트랜잭션 isolation, propagation, timeout 셋팅이 Step 레벨에서 가능합니다.

<step id="step1">
    <tasklet>
        <chunk reader="itemReader" writer="itemWriter" commit-interval="2"/>
        <transaction-attributes isolation="DEFAULT" 
                                propagation="REQUIRED" 
                                timeout="30"/>
    </tasklet>
</step>


2.6. Registering ItemStreams with Step


Step이 실패한 경우 재 시작할 필요가 있는데 이 경우 Repository로 부터 Step의 StepExecution 메티 정보를 참조하게 됩니다.

ItemStreams 인터페이스를 구현한 ItemReader, ItemProcessor, ItemWriter는 주기적으로 Step의 상태 정보를 저장 및 업데이트하게 됩니다.

하지만 커스텀 reader, processor, writer은 다음과 같이 명시적으로 ItemStreams로 등록되어야 합니다.

<step id="step1">
    <tasklet>
        <chunk reader="itemReader" writer="compositeWriter" commit-interval="2">
            <streams>
                <stream ref="fileItemWriter1"/>
                <stream ref="fileItemWriter2"/>
            </streams>
        </chunk>
    </tasklet>
</step>

<beans:bean id="compositeWriter" 
            class="org.springframework.batch.item.support.CompositeItemWriter">
    <beans:property name="delegates">
        <beans:list>
            <beans:ref bean="fileItemWriter1" />
            <beans:ref bean="fileItemWriter2" />
        </beans:list>
    </beans:property>
</beans:bean>


2.7. Configuring Listener


Step에 Listener 설정하는 방법

<step id="step1">
    <tasklet>
        <chunk reader="reader" writer="writer" commit-interval="10"/>
        <listeners>
            <listener ref="chunkListener"/>
        </listeners>
    </tasklet>
</step>

StepExecutionListener


Step Execution의 가장 일반적인 리스너로써, Step이 시작하기 전, 종료 이후 Notification을 처리 할 수 있습니다.

주로 정상적으로 종료되었는지 아니면 실패하였는지에 대한 후 처리를 위해 사용됩니다.

public interface StepExecutionListener extends StepListener {

    void beforeStep(StepExecution stepExecution);

    ExitStatus afterStep(StepExecution stepExecution);

}


ChunkListener


특정 트랜잭션안에서 'chunk' 프로세스 시작전과 완류 이후에 어떤 로직을 수행하는데 도움이 되는 리스너입니다.

public interface ChunkListener extends StepListener {

    void beforeChunk();

    void afterChunk();

}


ItemReadListener


ItemReader에 의해 아이템 읽기 프로세스 중에 에러가 발생한 경우, 로그와 같은 후 처리 하기에 유용한 리스너입니다.

public interface ItemReadListener<T> extends StepListener {
  
    void beforeRead();

    void afterRead(T item);
    
    void onReadError(Exception ex);

}


ItemProcessListener


ItemProcessor에 의해 아이템 비즈니스 로직 프로세스 중에 에러가 발생한 경우, 로그와 같은 후 처리 하기에 유용한 리스너입니다.

public interface ItemProcessListener<T, S> extends StepListener {

    void beforeProcess(T item);

    void afterProcess(T item, S result);

    void onProcessError(T item, Exception e);

}


ItemWriteListener 


ItemWriter에 의해 아이템 쓰기 프로세스 중에 에러가 발생한 경우, 로그와 같은 후 처리 하기에 유용한 리스너입니다.

 public interface ItemWriteListener<S> extends StepListener {

    void beforeWrite(List<? extends S> items);

    void afterWrite(List<? extends S> items);

    void onWriteError(Exception exception, List<? extends S> items);

}


SkipListener


ItemReader, ItemProcessor, ItemWriter 프로세스 중에 Skip된 아이템을 추적하는데 유용한 리스너입니다.

주로 Skip된 아이템을 로깅하는데 사용됩니다.

상기의 'Configuring Skip Logic'을 참조 바랍니다.


public interface SkipListener<T,S> extends StepListener {

    void onSkipInRead(Throwable t);

    void onSkipInProcess(T item, Throwable t);

    void onSkipInWrite(S item, Throwable t);

}


2.8 Controller Step Flow


Sequential Flow


'Step' 엘리먼트의 'next' 에트리뷰트를 적용함으로써 순차적인 Step 흐름을 설정할 수 있습니다.

단점으로는, 만약 stepA가 실패하면 전체 Job이 실패하게 됩니다.

<job id="job">
    <step id="stepA" parent="s1" next="stepB" />
    <step id="stepB" parent="s2" next="stepC"/>
    <step id="stepC" parent="s3" />
</job>

Conditional Flow 


다음의 조건적인 Step 흐름 설정으로 stepA의 'ExitStatus'가 'FAILED'인 경우 stepC로 이동하며, 그 외의 'EixtStatus' 결과값은 stepB로 그 흐름이 이동함을 말합니다.

<job id="job">
    <step id="stepA" parent="s1">
        <next on="*" to="stepB" />
        <next on="FAILED" to="stepC" />
    </step>
    <step id="stepB" parent="s2" next="stepC" />
    <step id="stepC" parent="s3" />
</job>
상기의 ExitStatus는 BatchStatus가 아님을 주목하시길 바랍니다. BatchStatus는 Job 및 Step의 상태를 기록하기 위한 JobExecution 및 StepExecutio의 property로, 그 값은 다음과 같습니다. - COMPLETED, STARTING, STARTED, STOPPING, STOPPED, FAILED, ABANDONED 또는 UNKNOWN. 반면, ExitStatus는 Step이 실행 종료 이후의 상태를 나타내는 코드로 다음 step으로 이동할 것인지 여기서 Job을 멈출 것인지를 판단하는 코드입니다.
public class SkipCheckingListener extends StepExecutionListenerSupport {

    public ExitStatus afterStep(StepExecution stepExecution) {
        String exitCode = stepExecution.getExitStatus().getExitCode();
        if (!exitCode.equals(ExitStatus.FAILED.getExitCode()) && 
              stepExecution.getSkipCount() > 0) {
            return new ExitStatus("COMPLETED WITH SKIPS");
        }
        else {
            return null;
        }
    }

}

출처 : http://naradesign.net/wp/2008/05/27/144


float을 clear하는 4가지 방법.

본문 건너 뛰기

CSS 속성 가운데 float 속성은 자기 자신의 위치를 주변의 콘텐츠로부터 상대적으로 배치하는 속성입니다. float은 사전적 의미로 ‘뜨다, 띄우다, 뜨는 물건, 부유물’ 이라는 의미가 담겨져 있습니다. float은 높이가 가변적인 다단 컬럼 형태의 CSS 레이아웃을 위하여 반드시 요구되는 속성으로서 처음 CSS 배치기법을 익힐 때 가장 이해하기 어려운 속성중의 하나 입니다. float 속성이 부여된 엘리먼트는 좌측이나 우측으로 배치되면서 주변 콘텐츠의 배치에도 영향을 미친다는 사실은 어렵지 않게 학습되나 ‘float 된 엘리먼트가 부모 엘리먼트의 높이에 영향을 주지 않는다는 사실’은 몇 번의 경험 또는 선배들의 조언으로 깨닫게 되는 것이지요.

오늘은 float 속성을 이해하고 다단 컬럼형 레이아웃을 시도할 때 주변 엘리먼트들이 원하는 상태로 배치될 수 있도록 이것에 대응하거나 clear 하는 방법에 대하여 공유하고자 합니다. clear 속성은 float이 더이상 주변 엘리먼트의 배치에 영향을 미치지 않도록 해제시키는 속성입니다. 만약 Internet Explorer 브라우저를 사용하여 학습을 시도하신다면 일단 멈추시고 표준계열 브라우저에서 먼저 시도해 보세요. CSS 표준 렌더링을 엄격하게 준수하는 Opera와 Safari를 권장합니다. Internet Explorer와 Firefox 브라우저는 float, clear 속성에 관한 버그를 포함하고 있으므로 float과 clear의 표준 렌더링이 어떻게 구현되는지를 학습할 때 도움이 되지 않습니다. 하지만 버그를 해결하는 방법도 소개되어 있으니 안심하세요.

오늘 글의 핵심은 ‘float된 자식 엘리먼트의 높이를 부모 엘리먼트에 반영하도록 대응하는 방법’ 이라고 한마디로 설명할 수 있겠습니다. 부모 떠난 자식을 다시 부모의 품 안으로 돌아오도록 하려면 어떻게 해야 하는지 한번 살펴 보시죠.

float에 아무런 대응도 하지 않은 상태

#container는 부모 엘리먼트이며 #lnb와 #content는 자식 엘리먼트로서 현재 float된 상태 입니다. 아래 예제는 float에 아무런 대응을 하지 않으면 자식 엘리먼트가 부모 엘리먼트의 높이에 영향을 주지 않는다는 사실을 보여주고 있습니다. #container의 높이가 자식 엘리먼트의 높이를 반영하지 않고 있다는 사실에 주목해 주세요. float에 아무런 대응도 하지 않은 상태의 예제가 준비되어 있습니다.

float에 아무런 대응도 하지 않은 상태의 예제

float에 float으로 대응하는 방법

자식 엘리먼트의 높이를 부모에게 반영하는 방법으로 부모에게도 float 속성을 부여하는 방법이 있습니다. 부모에게 float 속성을 부여하게 되면 부모엘리먼트는 자식 엘리먼트의 높이를 반영합니다. 하지만 부모 엘리먼트의 너비는 float된 두 자식의 너비를 담을만큼만 작게 줄어든다는 사실에 주목해 주세요. 부모의 너비가 브라우저 크기에 따라 가변적이어야 하는 경우에 적용하기 어려운 단점이 있습니다. 또한 조상 엘리먼트들이 겹겹이 존재하는 경우 자식의 높이를 조상 엘리먼트에게 각각 전달하기 위하여 조상 엘리먼트들을 모두 float 시켜야 하므로 일반적으로 사용하는것을 권장하지 않습니다. float에 float으로 대응하는 방법 예제.

float에 float으로 대응하는 방법 예제

float에 overflow 속성으로 대응하는 방법

자식 엘리먼트의 높이를 부모에게 반영하는 방법으로 부모 엘리먼트에 overflow:auto 또는 overflow:hidden 속성을 부여하는 방법이 있습니다. overflow:auto 속성은 자식의 너비가 가변적이고 부모의 너비보다 커지는 상황이 발생할 때 가로 스크롤바를 유발하기 때문에 일반적으로 권장하는 방식이 아닙니다. overflow:hidden 속성은 그러한 상황에서 가로 스크롤바를 유발하지는 않지만 자식의 너비가 넘치는 경우 넘치는 부분이 잘리기 때문에 이 역시 완전하게 안전한 방법은 아닙니다. float에 overflow 속성으로 대응하는 방법 예제.

float에 overflow 속성으로 대응하는 방법

float을 빈 엘리먼트로 clear 하는 방법

이 방법은 #container 영역이 끝나기 직전 빈 엘리먼트를 넣고 빈 엘리먼트에 clear:both 속성을 부여하여 부모가 자식의 높이를 인식하도록 하는 방법입니다. 하지만 의미 없는 빈 엘리먼트를 사용하기 때문에 이 역시 권장되는 방법은 아닙니다. float을 빈 엘리먼트로 clear 하는 방법 예제. 예제에서는 .clear 라는 빈 엘리먼트를 가시적으로 보이도록 하였지만 실무에서는 보통 .clear {clear:both; height:0; overflow:hidden;} 처리하여 .clear 라는 빈 엘리먼트가 스스로 높이를 갖지 않도록 하고 보이지 않도록 처리 합니다.

float을 빈 엘리먼트로 clear 하는 방법 예제

float을 가상 선택자 :after로 clear 하는 방법

가장 탁월하다고 생각하는 방법 입니다. 우선 ‘가상 선택자‘라는 개념을 이해하셔야 하기 때문에 약간 상세히 설명드리겠습니다. 여러분들이 익히 알고 계시는 :link, :visited:hover, :active, :focus는 모두 가상 선택자 입니다. ‘가상 선택자’는 다시 ‘가상 클래스‘와 ‘가상 엘리먼트‘로 구분할 수 있는데요. ‘가상 클래스‘는 특정 엘리먼트에 대하여 아무런 class를 부여하지 않았지만 마치 역동적으로 class를 변경한것과 같은 효과를 낼 수 있는 것들로서 이미 존재하는 엘리먼트에 조합해서 사용할 수 있습니다.  :link, :visited:hover, :active, :focus:first-child가 가상 클래스에 해당됩니다. 한편 ‘가상 엘리먼트‘란, 존재하지 않는 엘리먼트를 가상으로 생성해내는 선택자로서 :first-line:first-letter:before, :after가 있습니다. 심지어 :before와 :after는 HTML문서상에 존재하지 않는 콘텐츠를 출력시키기도 합니다.  Hello World Collection이라는 웹 사이트에 신현석님이 ‘Hello World’라는 메시지를 어떻게 출력했는지 살펴보시면 재미있고 이해하기도 쉽죠. 이렇게 가상의 엘리먼트를 생성 #container:after {content:" "} 시킨 다음 display:block; clear:both 처리를 추가하게 되면 의미 없는 빈 엘리먼트를 사용하지 않으면서도 가상 엘리먼트를 이용하여 깔끔하게 float이 clear됩니다. float을 가상 선택자 :after로 clear 하는 방법 예제.

float을 가상선택자 :after로 clear 하는 방법 예제

상기 예제로부터 가상 엘리먼트가 스스로 높이를 갖지 않고 화면에 보이지 않도록 처리 하려면 아래와 같이 처리 합니다.

#container:after {content:""; display:block; clear:both;}

하지만 Internet Explorer는 :before, :after 가상 엘리먼트 선택자를 지원하지 않기 때문에 다음과 같은 Hack이 필요합니다. 

#container {*zoom:1;} /* IE5.5~7 브라우저 대응 Hack */
#container:after {content:" "; display:block; clear:both;} /* 표준계열 브라우저에 대응하는 float 해제용 가상 엘리먼트의 생성 */

IE 5~7 브라우저는 hasLayout이라는 고유한 성질을 갖게 되면 float을 해제하는 트리거로 작용하는 성질이 있고 zoom:1 속성이 hayLayout 이라는 성질을 갖도록 하기 때문에 IE 5~7 브라우저 고유의 특징을 이용한 해결방법 입니다.

float을 display:inline-block 으로 clear 하는 방법

float된 자식요소들의 높이를 부모에게 전달하는 방법으로써 부모 요소에 display:inline-block 속성을 부여하는 방법도 있습니다. [코멘트 해주신 김영환님 감사합니다] inline-block 속성이 부여된 요소는float된 자식의 높이만큼 늘어납니다. [CSS 2.1 관련 설명 코멘트 해주신 연홍석님 감사합니다] 모든 브라우저가 동일하게 float을 해제하는 방향으로 작용합니다. 단, 표준계열 브라우저들은 부모 요소의 너비가 자식의 너비만큼 알맞게 줄어들지만 IE 6~7 브라우저는 100%의 너비를 갖게 되는 특징이 있습니다. 또한 inline-block 속성을 갖게 된 요소는 인라인 요소와 마찬가지로 박스가 끝나는 지점에 약 4px 정도의 공백을 갖게 되므로 이점 유념하시는게 좋겠습니다. 

참조


# setDomain.sh

#!/bin/bash

SYSTEM_ID=`echo ${PWD##*/} | sed s/domain//g`
DOMAIN_NAME=webDomain
DOMAIN_HOME=/was/domains/${DOMAIN_NAME}
LOG_DIR=/log/weblogic/${SYSTEM_ID}/${SERVER_NAME}

ADMIN_URL="t3://host명:12100"
DEFAULT_LOG_PFX="${LOG_DIR}/stdout.log."
export ADMIN_URL DEFAULT_LOG_PFX


# WAS Options
USER_MEM_ARGS="${USER_MEM_ARGS} -D${SERVER_NAME}"
USER_MEM_ARGS="${USER_MEM_ARGS} -Dweblogic.system.BootIdentityFile=${DOMAIN_HOME}/boot.properties"
USER_MEM_ARGS="${USER_MEM_ARGS} -Dweblogic.MuxerClass=weblogic.socket.PosixSocketMuxer"
USER_MEM_ARGS="${USER_MEM_ARGS} -Dweblogic.SelfTuningThreadPoolSizeMin=50"
USER_MEM_ARGS="${USER_MEM_ARGS} -Dweblogic.PrintStackTraceInProduction=true"
USER_MEM_ARGS="${USER_MEM_ARGS} -Doracle.jdbc.fanEnabled=false"

# GC Options
USER_MEM_ARGS="${USER_MEM_ARGS} -XX:+UseG1GC"
USER_MEM_ARGS="${USER_MEM_ARGS} -XX:+PrintGCDetails"
USER_MEM_ARGS="${USER_MEM_ARGS} -XX:+PrintGCTimeStamps"
USER_MEM_ARGS="${USER_MEM_ARGS} -verbose:gc"
USER_MEM_ARGS="${USER_MEM_ARGS} -Xloggc:${LOG_DIR}/gc/${SERVER_NAME}_GC.log.`date '+20%y%m%d_%H%M%S'`"

# Dump Options
USER_MEM_ARGS="${USER_MEM_ARGS} -XX:+HeapDumpOnOutOfMemoryError"
USER_MEM_ARGS="${USER_MEM_ARGS} -XX:HeapDumpPath=${DOMAIN_HOME}"

# ETC Options
USER_MEM_ARGS="${USER_MEM_ARGS} -Djava.net.preferIPv4Stack=true"
USER_MEM_ARGS="${USER_MEM_ARGS} -Djava.security.egd=file:///dev/urandom"
USER_MEM_ARGS="${USER_MEM_ARGS} -Dfile.encoding=UTF-8"

exprot USER_MEM_ARGS


# startWeb01_i01.sh

#!/bin/bash
SERVER_NAME=`echo $0 | sed 's/.sh//g' | sed 's/.\///g' | sed 's/start//g'`

. ./setDomain.sh

USER_MEM_ARGS="-D${SERVER_NAME} -Xms1g -Xmx1g -XX:+HeapDumpOnOutOfMemoryError ${USER_MEM_ARGS}"

JAVA_OPTIONS="${JAVA_OPTIONS} -Dfile.encoding=UTF-8"

export USER_MEM_ARGS JAVA_OPTIONS

nohup ./bin/startManagedWebLogic.sh ${SERVER_NAME} ${ADMIN_URL} 2>&1 | ./LOGS.pl ${DEFAULT_LOG_PFX} &

echo "tail -f ${DEFAULT_LOG_PFX}`date +%Y%m%d`"

# LOGS.pl

#!/usr/bin/perl

$TRUE=1;
$FALSE=0;
$DEBUG=$FALSE;

$DEFAULT_LOG_PFX=$ARGV[0];

$logPfx=$DEFAULT_LOG_PFX;
$ignoreConsole=$FALSE;

while($aLine = <STDIN>) {
    ($sec,$min,$hour,$mday,$mon,$year,$wday,$yday,$isdst) = localtime(time());
    $logFile=$logPfx.sprintf("%04d%02d%02d",($year+1900),($mon+1),$mday,$hour,$min,$sec);
    open(logH,">> $logFile");
    # Auto flash ON
    select((select(logH),$|=1)[0]);
    
    # use IO::Handle;
    
    # logH->autoflush($TRUE);
    
    print logH $aLine;
    
    if($ignoreConsole) {
        print $aLine;
    }
    
    close(logH);
}


# stopWeb01_i01.sh

#!/bin/bash

SERVER_NAME=`echo $e | sed 's/.sh//g' | sed 's/.\///g' | sed 's/stop//g'`
PROCESS_ID=`ps -ef | grep java | grep -v grep | grep 사용자계정ID | grep -w D${SERVER_NAME} | awk '{print $2}'`

ps -ef | grep java | grep -v grep | grep 사용자계정ID | grep -w D${SERVER_NAME} | awk '{print $2}' | xargs kill -9
echo "#####" ${SERVER_NAME} "==" ${PROCESS_ID} "== kill"


==========================================================================================

Weblogic 12C

* /WEB-INF/weblogic.xml 설명
URL : https://docs.oracle.com/middleware/12212/wls/WBAPP/weblogic_xml.htm


- weblogic.xml 샘플

<?xml version="1.0" encoding="UTF-8"?>
<weblogic-web-app xmlns="http://xmlns.oracle.com/weblogic/weblogic-web-app">
    <context-root>/</context-root>
    <session-descriptor>
        <persistent-store-type>replicated_if_clustered</persistent-store-type>
        <sharing-enabled>true</sharing-enabled>
    </session-descriptor>

    <container-descriptor>
        <prefer-application-packages>
           <package-name>org.slf4j</package-name>
           <package-name>log4j</package-name>
        </prefer-application-packages>
       
        <prefer-application-resources>
            <resource-name>com.sun.faces.*</resource-name>
        </prefer-application-resources>
    </container-descriptor>

</weblogic-web-app>


* /META-INF/application.xml 설명
URL : https://docs.oracle.com/middleware/1212/wls/WLPRG/app_xml.htm


* Command Deploy

- deploy (war)

java -cp "C:\Oracle\Middleware\Oracle_Home\wlserver\server\lib\weblogic.jar" \
    weblogic.Deployer -adminurl t3://127.0.0.1:7001 \
    -username weblogic -password weblogic1 \
    -deploy C:\dev\workspaces\eclipse-jee-2018-09-win32-x86_64\pubfreq\build\libs\pubfreq.war


- deploy (folder)

java -cp "C:\Oracle\Middleware\Oracle_Home\wlserver\server\lib\weblogic.jar" \
    weblogic.Deployer -adminurl t3://127.0.0.1:7001 \
    -username weblogic -password weblogic1 \
    -deploy C:\dev\workspaces\eclipse-jee-2018-09-win32-x86_64\pubfreq\build\libs\pubfreq


- undeploy

java -cp "C:\Oracle\Middleware\Oracle_Home\wlserver\server\lib\weblogic.jar" \
    weblogic.Deployer -adminurl t3://127.0.0.1:7001 \
    -username weblogic -password weblogic1 -undeploy -name pubfreq


* 아래와 같은 오류 발생 시

<2019. 1. 8 오후 10시 04분 52초 KST> <Error> <javax.enterprise.resource.webcontainer.jsf.config> <BEA-000000> <Unknow type constant pool 18 at position 14>
<2019. 1. 8 오후 10시 04분 52초 KST> <Error> <javax.enterprise.resource.webcontainer.jsf.config> <BEA-000000> <Unknow type constant pool 0 at position 15>
<2019. 1. 8 오후 10시 04분 52초 KST> <Error> <javax.enterprise.resource.webcontainer.jsf.config> <BEA-000000> <Unknow type constant pool 0 at position 16>
<2019. 1. 8 오후 10시 04분 52초 KST> <Error> <javax.enterprise.resource.webcontainer.jsf.config> <BEA-000000> <Unknow type constant pool 0 at position 17>
<2019. 1. 8 오후 10시 04분 52초 KST> <Error> <javax.enterprise.resource.webcontainer.jsf.config> <BEA-000000> <Unknow type constant pool 81 at position 18>
<2019. 1. 8 오후 10시 04분 52초 KST> <Error> <javax.enterprise.resource.webcontainer.jsf.config> <BEA-000000> <Unknow type constant pool 15 at position 81>
<2019. 1. 8 오후 10시 04분 52초 KST> <Error> <javax.enterprise.resource.webcontainer.jsf.config> <BEA-000000> <Unknow type constant pool 97 at position 84>


-  "com.sun.faces.*" 부분 추가

<?xml version="1.0" encoding="UTF-8"?>
<weblogic-web-app xmlns="http://xmlns.oracle.com/weblogic/weblogic-web-app">

    <container-descriptor>
        <prefer-application-resources>
                <resource-name>javax.faces.*</resource-name>
                <!-- 이 부분 추가 -->
                <resource-name>com.sun.faces.*</resource-name>
                <resource-name>com.bea.faces.*</resource-name>
            </prefer-application-resources>
    </container-descriptor>

</weblogic-web-app>


=========================================================================================================


다운로드 : http://www.oracle.com/
               http://www.oracle.com/technetwork/middleware/weblogic/downloads/wls-for-dev-1703574.html

참고 : http://antop.tistory.com/132
         http://blog.naver.com/jadin1/70117413544  (Admin 서버외의 Managed Server 구성 )

1. zip 파일 버전을 다운로드 후 압축을 해제한다.


2. 시스템 PATH 설정을 한다.
MW_HOME=압축해제 폴더


3. cmd 에서 실행

// 웹로직 설정 프로그램 실행
d:\weblogic>configure.cmd

// 웹로직 환경 적용
%MW_HOME%\wlserver\server\bin\setWLSEnv.cmd

// 도메인 생성
%MW_HOME%/wlserver/common/bin/config.cmd


4. 콘솔 한글 깨짐 수정 (UTF-8 설정)
웹로직 폴더\user_projects\domains\서버 도메인\bin\setDomainEnv.cmd 에서 UTF-8 부분 추가

set JAVA_PROPERTIES=-Dplatform.home=%WL_HOME% \
    -Dwls.home=%WLS_HOME% -Dweblogic.home=%WLS_HOME% \
    -Dwli.home=%WLI_HOME% -Dfile.encoding=UTF-8 -Dfile.client.encoding=UTF-8


* WebLogic 콘솔(관리자) URL
    http://localhost:7001/console/

* WebLogic Port 변경
    웹로직 폴더\user_projects\domains\서버 도메인\config\config.xml 에서 빨간색 부분 추가

<server>
    <name>AdminServer</name>
    <listen-port>7000</listen-port>
    <listen-address/>
  </server> 


* 도메인 삭제
1. Domain 디렉토리 삭제
    rm $WLS_HOME/user_projects/domains/$DOMAIN_NAME

2. nodemanager.domains 파일 수정
    $WLS_HOME/wlserver/common/nodemanager/nodemanager.domains 파일을 수정
    삭제한 domain의 이름으로 되어 있는 property를 삭제

3. domain-registry.xml
    $WLS_HOME/domain-registry.xml 파일을 수정
    Domain 이름이 없으니 해당되는 경로만 삭제

* 2개 이상의 도메인 실행 설정
1. 위에 WebLogic Port 변경 부분에서 포트를 도메인별로 할당한다.
2. $WLS_HOME/user_project/domains/$DOMAIN_NAME/bin/setDomainEnv.cmd에서 빨간색 부분 포트 변경

if "%DEBUG_PORT%"=="" (
    set DEBUG_PORT=8453
)


+ Recent posts